Every great adventure doesn't start with the first step on a trail, but with the very first thing you decide to put in your pack. Your backpacking essentials list is more than just a checklist; it's your blueprint for freedom, holding only what you need to move through the world with confidence.
Think of your backpack as your whole world, perfectly organized for the journey ahead.
Begin Your Adventure With the Perfect Pack
The real magic of backpacking begins the moment you start curating your own essentials list. This isn't just about stuffing gear into a bag; it's an act of choosing freedom. When you intentionally select each item, you free yourself from the weight of unnecessary stuff, opening up a world of spontaneous side trips and incredible experiences.
The philosophy is simple: travel light, travel smart. A heavy, disorganized pack is an anchor, tying you down and making it so much harder to say "yes" to that unexpected mountain trail or last-minute invitation. A well-packed bag, on the other hand, feels like a part of you, letting you float from a wild landscape to a busy city street with total ease.
Choosing Your Pack: The Foundation of Your Journey
Your backpack isn't just a container; it's your home on the go. Honestly, it's the single most important piece of gear you'll carry, and getting it right can make or break your trip.
For example, a pack like the Osprey Exos 58 is a total game-changer for so many hikers because it nails that perfect balance of weight and space. It comes in at under 3 pounds but gives you a generous 58 liters—plenty for a week-long trip. It's famous for carrying loads up to 40 pounds comfortably, which is a lifesaver on tough treks. For more expert tips, check out these backpacking checklists on rei.com.
Think of it this way: Your pack is the foundation of a house. A weak foundation can't support the structure, no matter how well-built the rest is. In the same way, the wrong pack will make every single mile feel longer.
More Than Just a List
As you work through this guide, you’ll see that packing is about so much more than just objects. It’s about being prepared, cultivating the right mindset, and making choices that feel true to your travel style.
It's also about respecting the incredible places we get to explore. When you pack with intention, you not only make your own trip better, but you also leave a lighter footprint on the planet. You can learn more about how to do that in our guide on how to travel sustainably.
The Core Four Backpacking Essentials
Once you have your pack, the real alchemy begins. A smart backpacking list isn't just a random pile of gear; it’s a living, breathing system you build with intention. The best way to get it right is to focus on what I call the Core Four: the absolute pillars of safety, comfort, and self-sufficiency out on the trail.
Think of these four categories as the foundation of your mobile world. Nail these, and everything else just falls into place. You’ll move with a quiet confidence, knowing you’re prepared for whatever the adventure throws your way. Let’s break them down.
Shelter and Sleep System
Out there, your shelter and sleep system becomes your sanctuary. It's your personal refuge from wind, rain, and the biting cold after a long, rewarding day of hiking. This isn’t just about a tent—it's about a complete system designed to recharge your body and mind so you can do it all again tomorrow.
These three components work together in beautiful harmony:
- Tent or Tarp: This is your primary shield. A tent offers full-on protection from bugs and bad weather, while a minimalist tarp can shave off serious weight if you're traveling in milder conditions.
- Sleeping Bag: Consider this your personal furnace. The age-old debate between down (incredibly light and compressible) and synthetic (insulates better when damp) really just comes down to the climate you're headed for.
- Sleeping Pad: This is the unsung hero of a good night's sleep. A pad does more than just cushion you from lumpy ground; its main job is to insulate you from the cold earth, which can suck the warmth right out of you faster than you’d think.
Your sleep system components are the heavy hitters in your pack, often making up 30-40% of your total base weight, even in modern ultralight setups. For example, a top-tier ultralight sleeping bag rated for 20°F (-6°C) might weigh a mere 19 ounces (538g) and pack down to the size of a water bottle.
But all that warmth is useless without proper ground insulation. A sleeping pad with an R-value of 2.5 or higher is crucial for staying warm in temps above freezing. In fact, recent surveys found that 60% of Pacific Crest Trail thru-hikers chose pads with at least a 2.5 R-value to fend off the very real risk of hypothermia. If you want to dive deeper into insulation ratings, you can learn more by exploring this detailed backpacking checklist on happiestoutdoors.ca.
Clothing and Wearables
The clothes on your back are your first line of defense. The secret to all-day comfort isn't packing a giant wardrobe; it's mastering the simple art of layering. Layering lets you adapt on the fly, adding or shedding pieces to stay perfectly regulated whether you're sweating up a sunny ridge or chilling in a cool, misty valley.
Think of your clothing system like an onion. You start with a moisture-wicking base layer to pull sweat away from your skin. Then you add a cozy fleece or puffy mid-layer for insulation. Finally, you top it all with a waterproof shell to block wind and rain. Each layer has a specific job, and together, they’re unstoppable.
Footwear is another game-changer. Your hiking boots or trail runners are your connection to the earth, and the right pair is the difference between a joyful hike and a blister-filled nightmare. Pro tip: always, always break them in before a big trip! And please, never underestimate the power of good rain gear. A truly waterproof jacket and pants can literally be a lifesaver in a sudden downpour.
This next diagram shows the key things to look for in the pack that will carry all these essentials.
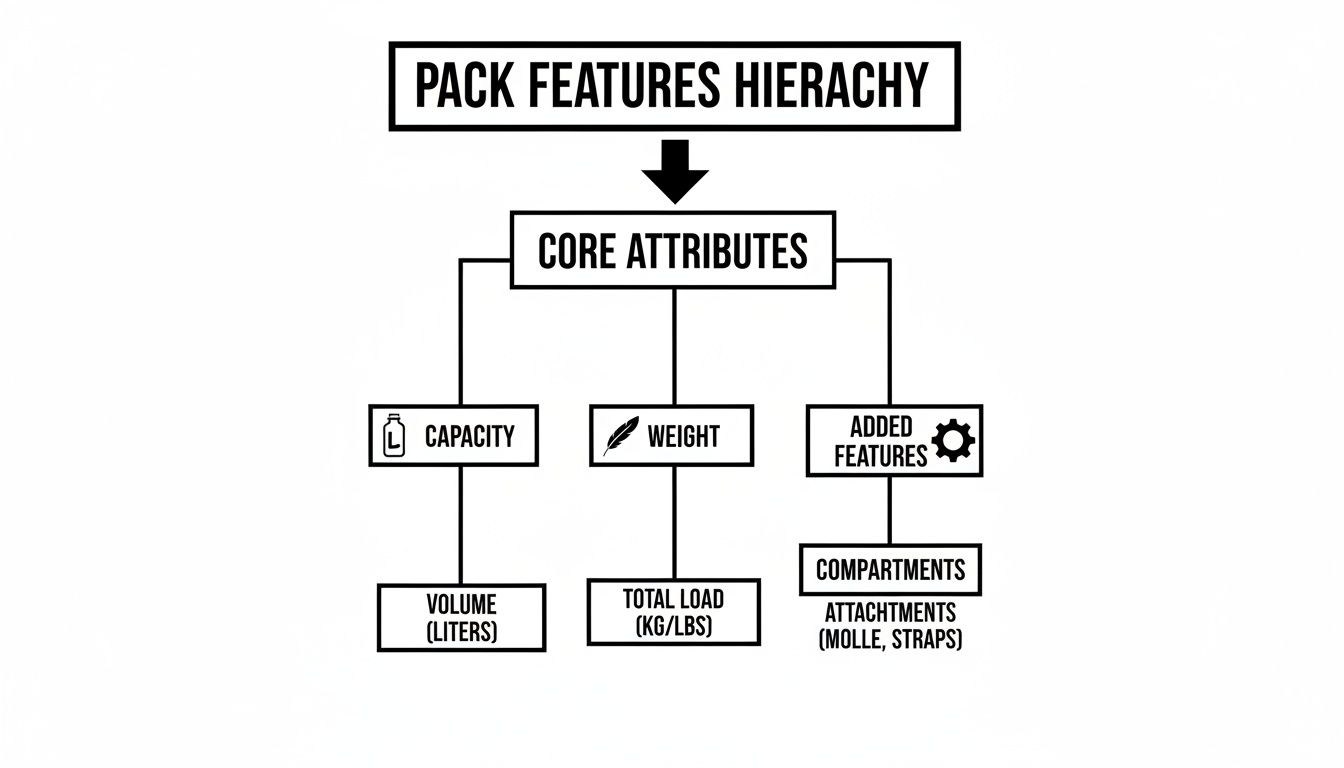
As you can see, it all boils down to capacity, weight, and features. Getting that balance right is key to carrying your core gear comfortably.
Kitchen and Nutrition
Food is fuel. Your backcountry kitchen is what turns that fuel into the warm, soul-soothing meals that power you forward. A well-thought-out kitchen system makes cooking on the trail a simple pleasure instead of a frustrating chore.
Here’s what your core setup looks like:
- Stove and Fuel: This is the engine of your operation. Canister stoves are incredibly easy to use and boil water in a flash. Liquid fuel stoves, on the other hand, are the champs in freezing weather and are much easier to refuel on international trips.
- Cook Pot: For most trips, a single lightweight pot is all you need to boil water for dehydrated meals, make that life-giving morning coffee, or cook up some simple grains.
- Utensil: A sturdy spork is a backpacker’s best friend. Spoon, fork, one lightweight tool. Done.
- Food Storage: Depending on where your boots take you, this could be a simple stuff sack or a required hard-sided bear canister to protect your food (and, just as importantly, the local wildlife).
Planning what you eat is just as crucial as how you cook it. Focus on calorie-dense, lightweight foods—think dehydrated meals, nuts, dried fruit, and energy bars—to get the most energy for the least amount of weight.
Navigation Tools
Knowing where you are and where you're headed is the bedrock of safety and confidence. While modern tech has made getting around easier than ever, a smart backpacker always carries a mix of digital and analog tools. Redundancy isn't just a good idea; it's essential.
Your navigation toolkit should always include these three things:
- Map: A physical, waterproof map of the area is your most trustworthy guide. It never runs out of batteries.
- Compass: A simple magnetic compass, paired with your map, is your lifeline. Learning basic map-and-compass skills is one of the most empowering things you can do and is a critical backup if your electronics give up the ghost.
- GPS Device or Phone: A dedicated GPS or a smartphone with downloaded offline maps (from an app like Gaia GPS) gives you incredible real-time data. Just be sure to carry a portable power bank to keep it juiced up.
This quick-reference table summarizes the absolute must-haves from each of the Core Four categories.
Essential Gear Breakdown by Category
Getting these four systems dialed in is the key to building a reliable, efficient kit.
These Core Four categories—Shelter, Clothing, Kitchen, and Navigation—truly are the unshakeable foundation of any backpacking essentials list. By carefully choosing your gear in each of these areas, you're not just packing for a trip; you're building a system that empowers you to explore the world with preparedness and complete peace of mind.
Staying Healthy, Safe, and Clean on the Trail
An unforgettable adventure isn't just about the views; it's built on a foundation of well-being. Think of your health, hygiene, and safety gear as an invisible shield, giving you the power to handle whatever comes your way with confidence. These are the small, smart choices that keep you strong, clean, and ready for anything the trail throws at you.
This part of your packing list is deeply personal, but the principles are universal. It's all about respecting your body and the wild places you've come to explore. From purifying water to patching up a blister, getting these fundamentals right ensures your journey is defined by empowerment, not by easily avoided problems.
The Lifeblood of Your Journey: Water Purification
Out here, water is everything. Staying properly hydrated fuels your muscles, keeps your mind sharp, and your energy levels high. But you can't just drink from any beautiful, clear-looking stream. You need a reliable system to get rid of the nasty bacteria and protozoa that can be lurking within.
Your choice of water treatment is a cornerstone of your trail health strategy. Most backpackers lean on two main methods: filtration and purification. Each has its pros and cons.
- Water Filters: These are the workhorses of the backcountry. They physically strain out microorganisms. Squeeze filters, like the ever-popular Sawyer Squeeze, are loved for being simple, lightweight, and lasting for ages.
- UV Purifiers: Gadgets like the SteriPen use ultraviolet light to zap viruses, bacteria, and protozoa. They're fast and effective, but they do need batteries and won't work well in murky water.
The importance of water and hygiene can't be overstated, topping the 'Ten Essentials' list for 95% of backpackers. With dehydration hitting nearly 70% of hikers each year, carrying 1-2 liters of water and having a solid treatment plan is absolutely non-negotiable. Filters are king out here; the Sawyer Squeeze was the #1 filter on the 2025 Pacific Crest Trail, used by a staggering 42% of over 1,000 thru-hikers for its featherlight 3-ounce weight and insane longevity.
Hygiene With Respect: Leave No Trace
Staying clean in the backcountry isn't just about feeling good—it's a profound act of respect for the environment. Following Leave No Trace principles is our collective promise to keep the wilderness wild for everyone who comes after us.
Your hygiene kit should be minimalist but mighty, designed to have as little impact as possible. That means packing biodegradable items and having a plan to manage every single piece of waste.
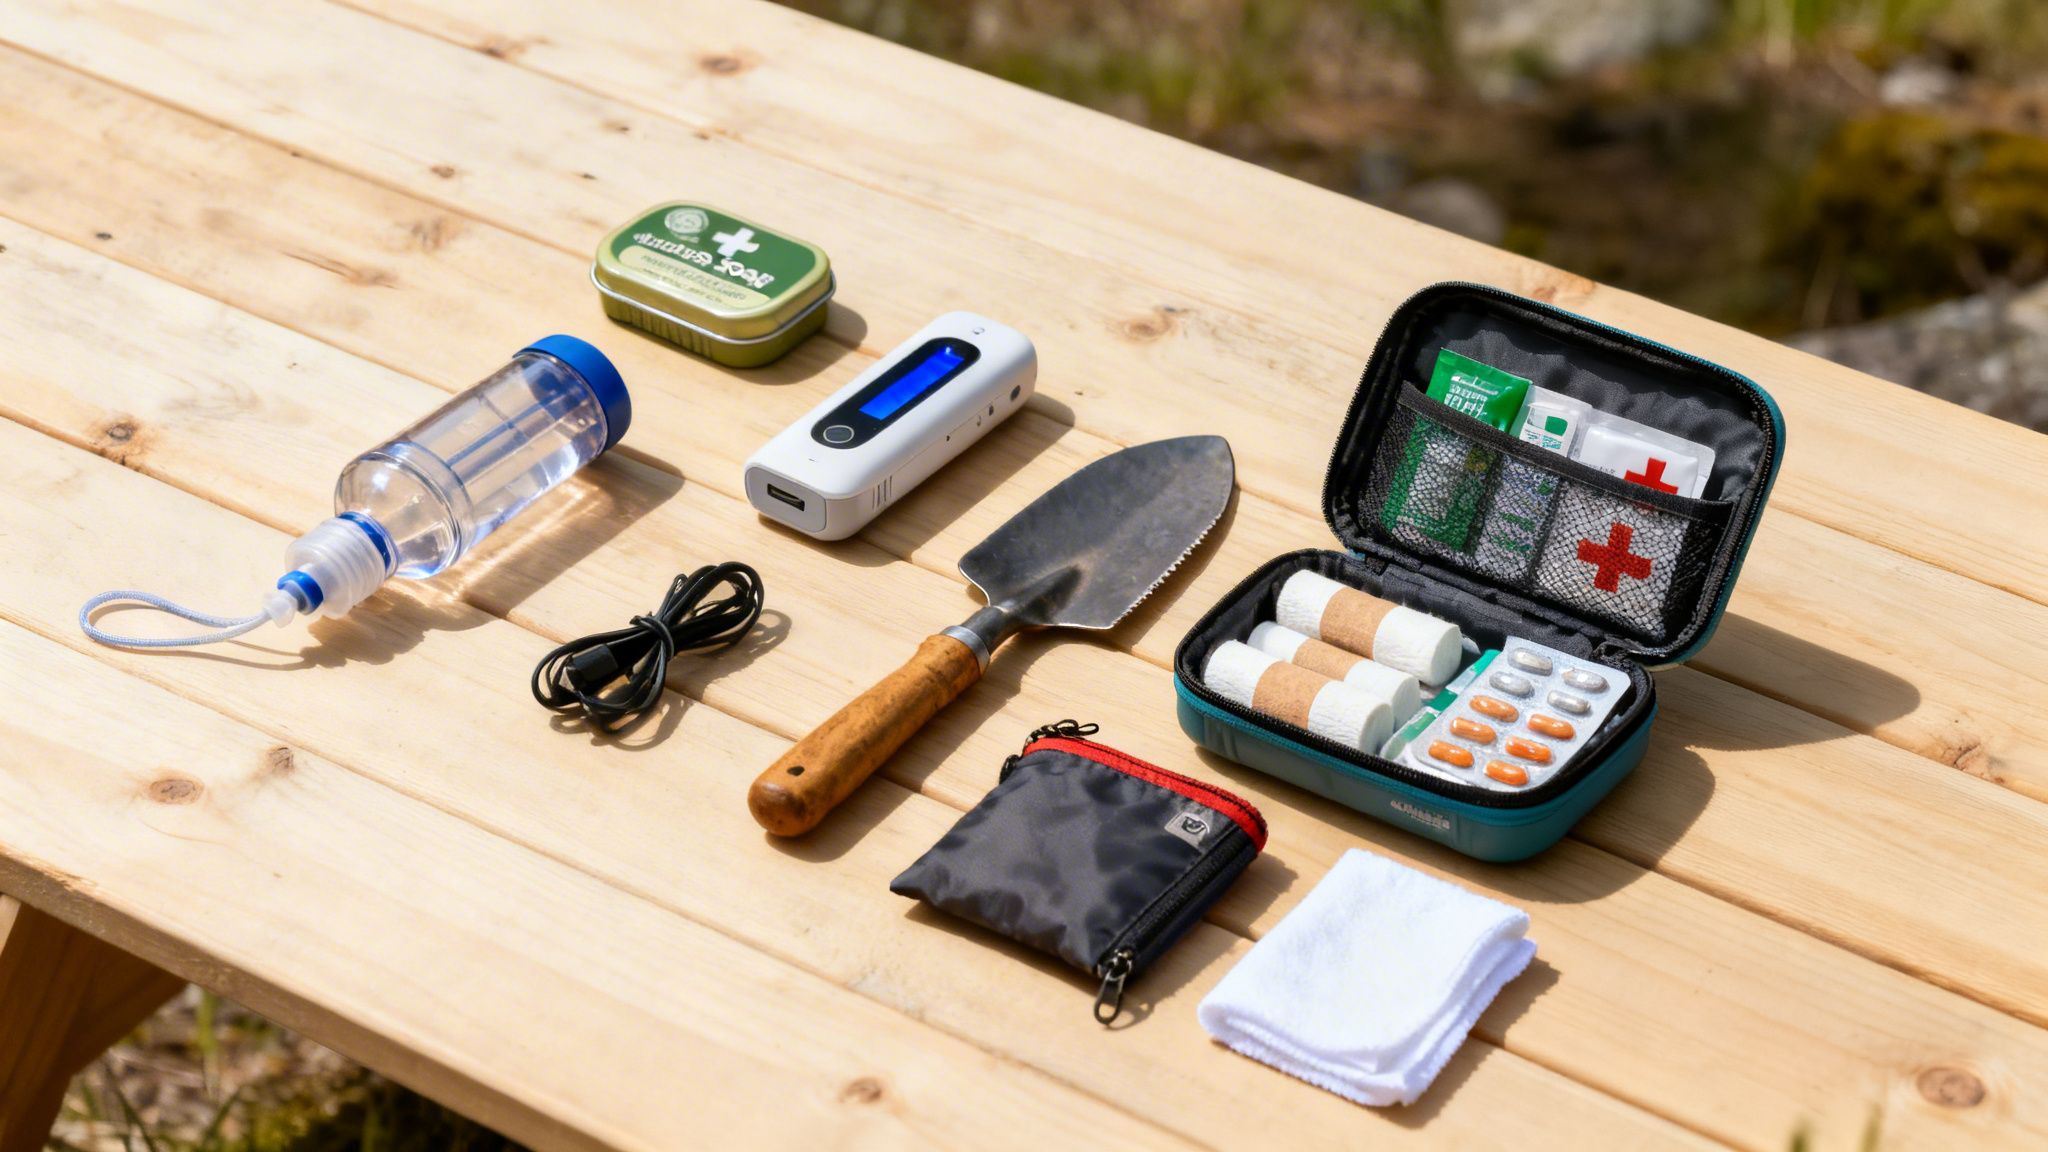
A solid backcountry hygiene kit always includes:
- A Trowel: This is for digging catholes 6-8 inches deep to bury human waste. Always dig your hole at least 200 feet (about 70 big steps) away from water, trails, and campsites.
- Biodegradable Soap: Use it sparingly and well away from any water source to wash your hands, dishes, or yourself.
- Hand Sanitizer: A quick, water-free way to clean your hands before eating or after a bathroom break.
- Pack-Out Bags: A designated Ziploc or odor-proof bag is crucial for packing out used toilet paper and all your trash. In fact, a shocking 80% of trails now ban burying toilet paper because it harms wildlife and takes forever to decompose.
"The golden rule of the outdoors is simple: leave it better than you found it. Every small, thoughtful action—from choosing the right spot for a cathole to packing out a tiny wrapper—collectively preserves the magic of the wild."
Building Your Personal First-Aid Kit
Your first-aid kit is your personal safety net. Sure, you can buy a pre-made one, and that's a decent start. But the best, most effective kit is one you customize for your own needs and the specific trip you're taking. Think of it less as an emergency-only tool and more as your trailside wellness center.
Beyond a few bandages, a great kit empowers you to deal with the most common trail issues quickly and effectively. This proactive mindset stops minor annoyances from turning into trip-ending disasters. If you're thinking about broader trip protection, you might find our guide on comparing different travel insurance plans helpful.
Start with a solid foundation, then add your personal must-haves. A well-rounded kit should have supplies for:
- Wound Care: Antiseptic wipes, an assortment of bandages, gauze pads, and medical tape.
- Blister Prevention and Treatment: Moleskin or other blister pads are a hiker's absolute best friend. The key is to treat hotspots the second you feel them, before they become full-blown blisters.
- Pain and Illness: Pack pain relievers like ibuprofen, antihistamines for allergic reactions, and of course, any personal medications you need.
- Tools: A small pair of tweezers for splinters and ticks, and either compact scissors or a knife on a multi-tool.
By thoughtfully putting together your health, hygiene, and safety systems, you build the confidence to move through the world with true independence. You become your own best resource, fully prepared to care for yourself and the incredible environments you have the privilege to explore.
Your Digital Lifeline: Tech and Documents
Let's face it, even when we're trying to disconnect, a little bit of tech goes a long way. These days, your phone isn't just for calls; it's your map, your camera, your translator, and your connection to the world. Your passport and wallet? Well, those are your golden tickets.
Getting this part right isn't just about convenience—it's about staying safe and keeping your trip moving smoothly. A dead phone in an unfamiliar city or a lost passport can turn a dream trip into a logistical nightmare. Let's make sure that never happens.
Power Up and Stay Connected
Your smartphone is the ultimate multitool, but it's only as good as its battery life. That's why a portable power source is one of the most important things you can pack.
- Power Bank: A solid 10,000mAh power bank usually hits the sweet spot. It's got enough juice for about 2-3 full phone charges but won't weigh you down.
- Universal Adapter: If you're crossing borders, this is non-negotiable. A good universal adapter means you can plug in and recharge whether you're in a hostel in Hanoi or an airport in Amsterdam.
- Charging Cables: Pack what you need, and consider a shorter, more durable cord to save space and avoid tangles.
With a charged phone, you've got access to a ton of incredible tools right at your fingertips. For some of our favorites, check out our guide to the best travel apps for any journey.
I like to think of my power bank as an emergency flare. You hope you never have to use it all, but knowing it’s there gives you the confidence to wander a little further, knowing you can always pull up a map or call for help.
Keep Your Essentials Safe and Sound
Your passport, visas, and money are the keys to your adventure. Protecting them is mission-critical. Losing any of them can throw a serious wrench in your plans, but a little prep work makes all the difference.
First things first: go digital. Snap clear photos of your passport, driver's license, visas, and travel insurance policy. Save them to a secure cloud service like Google Drive or Dropbox. If the worst happens and your documents go missing, you'll have instant access to copies from any device.
Next up, let's talk money. Never, ever rely on a single source of cash. A smart traveler diversifies.
- Cash: Always have some local currency on hand. It's perfect for street food, local buses, or any place that doesn’t take cards.
- Credit Card: Choose one with no foreign transaction fees for big-ticket items like accommodation or tours. It’s also great for booking things online.
- Debit Card: This is your go-to for pulling cash from an ATM. Just remember to give your bank a heads-up about your travel dates so they don’t freeze your account.
Here’s a pro tip: don’t keep all your eggs in one basket. I always stash an emergency credit card and some extra cash in a hidden pocket of my main backpack, separate from the wallet I carry with me. That way, if my wallet gets lost or stolen, I'm not completely stranded. It's a simple backup plan that provides incredible peace of mind.
Your Pack, Your Adventure: Making It Your Own
A great backpacking list is never one-size-fits-all. Think of it less as a strict rulebook and more as a personal recipe. We've covered the core ingredients, but the real adventure begins when you start adjusting the spices to match the unique flavor of your journey.
This is the moment you go from just a backpacker to the architect of your own travels. You start looking past generic checklists and begin building a smart, adaptive system that feels like it was made just for you. Whether you're sweating it out in the jungle, tackling a high-altitude pass, or weaving through a bustling city, your pack should be your greatest ally, not just dead weight on your back.
The key is understanding how different environments and travel styles change your needs. A fleece jacket that's a lifesaver in the mountains is just useless bulk in the tropics. Below is a quick guide to help you start thinking about these trade-offs.
Packing List Customization Guide
This table is just a starting point, of course. Your personal comfort, budget, and the specific activities you have planned will always be the final deciding factors.
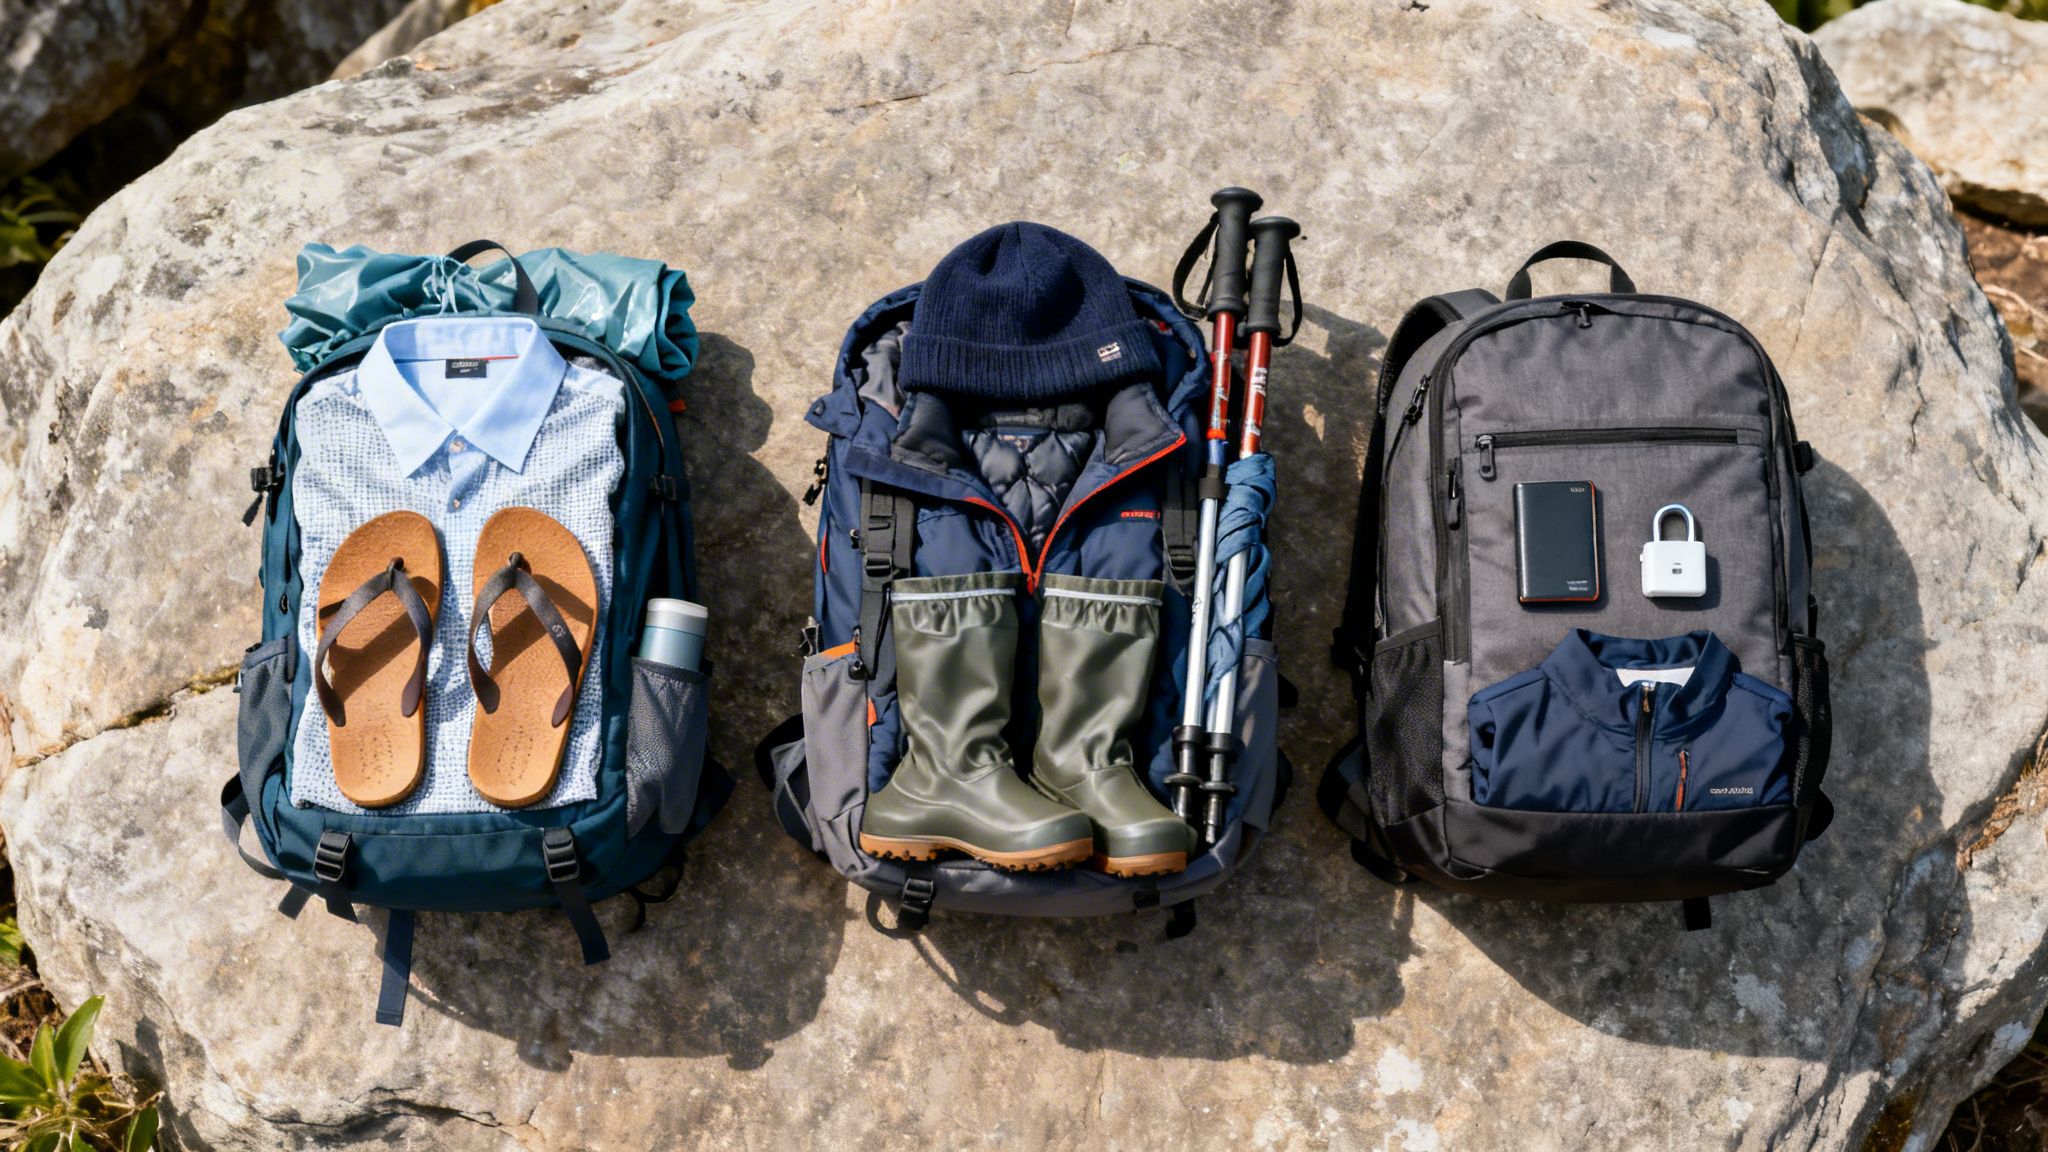
The Tropical Trek Template
When your plans take you to hot, humid places like Southeast Asia or Central America, your entire packing philosophy changes. Forget heavy insulation; breathability is everything. Your main goals are to manage moisture (from both sweat and daily downpours) and protect yourself from the sun and bugs.
- Focus on Fabrics: Swap out your standard hiking pants for a lightweight, quick-drying pair. A loose, long-sleeve sun shirt is often a smarter choice than a t-shirt, giving you sun protection and a barrier against mosquitos.
- Embrace the Rain: In the tropics, rain isn't a possibility—it's a certainty. A high-quality, breathable rain jacket is non-negotiable. Get a waterproof pack cover, or line your backpack with a heavy-duty trash bag to keep everything inside bone-dry.
- Build Your Bug Armor: A reliable insect repellent is your first line of defense. But for true peace of mind, pack a lightweight mosquito head net for evenings. It might look silly, but it's a game-changer for your sanity.
The Mountain Expedition Template
Heading for the mountains? Your strategy boils down to one word: layering. Alpine weather is notoriously fickle; you can easily experience all four seasons in a single afternoon. Staying safe and comfortable depends entirely on your ability to adapt to sudden temperature swings.
- Master Your Layers: Your clothing becomes your personal thermostat. You need a moisture-wicking base layer, an insulating mid-layer (like a fleece or puffy jacket), and a fully waterproof and windproof outer shell. With these three pieces, you can mix and match for any condition imaginable.
- Invest in a Warmer Sleep System: That 20°F (-6°C) sleeping bag becomes essential up high. Just as important is a sleeping pad with a higher R-value, which insulates you from the heat-sucking cold ground.
- Double Down on Navigation: Mountain terrain can be disorienting. This is where you absolutely must have redundancy: bring both a GPS device and a physical map and compass. Know how to use both.
The Urban Explorer Template
Backpacking isn’t always about wild, remote places. Sometimes the trail is a city street and your camp is a hostel dorm room. Here, your priorities shift from survival to security and social flexibility. You need gear that helps you blend in, stay secure, and connect with the culture around you.
- Think Security: A backpack with lockable zippers is a fantastic start. Always carry a small padlock for hostel lockers, and be mindful of how you carry your passport and cash.
- Pack for Versatility: Bring clothes that can be dressed up or down. A single pair of dark, comfortable travel pants can work for a day of sightseeing and then transition to a casual dinner out.
- Carry a Daypack: A small, packable daypack is a must-have. You can leave your big bag securely at the hostel and explore the city with just your daily essentials—water, a jacket, a camera, and a power bank. For more on getting organized, check out our guide on how to plan your first backpacking trip.
Special Considerations for Solo Female Travelers
For women traveling solo, personalizing your pack goes beyond just gear—it's about empowerment. Safety and confidence are deeply connected, and having the right tools can make a world of difference. The core list is the same, but a few small additions can provide immense peace of mind.
"I decided I was safe. I was strong. I was brave. Nothing could vanquish me." - Cheryl Strayed
This mindset is your foundation, and your gear should support it. Consider tucking these items into your pack:
- Doorstop Alarm: This tiny, lightweight device wedges under your door in a hostel or hotel room. If someone tries to force the door open, it lets out a piercing alarm. It's an incredible layer of security.
- Scarf or Sarong: This is the ultimate multi-tool. Use it for modesty when visiting religious sites, as a makeshift towel, a beach cover-up, or to simply dress up an outfit.
- Safety Whistle: Keep a loud whistle attached to your pack's shoulder strap where it's always within reach. It's a simple but incredibly effective way to attract attention if you're in trouble.
- Offline Lifelines: Always download offline maps of your destination. Before you head into an area with no service, text or email your full itinerary and accommodation details to a trusted friend or family member back home.
When you move beyond a generic checklist and thoughtfully build a pack for your adventure, it stops being just a bag of stuff. It becomes your tool for discovery, your mobile command center, and your key to unlocking the world.
Your Backpacking Questions Answered
Jumping into backpacking can feel like learning a whole new language, complete with its own lingo, gear, and unwritten rules. It's totally normal to have a ton of questions. Think of this section as your personal trail guide, here to offer clear, simple answers to those nagging uncertainties.
Let's demystify the process, build your confidence, and get you ready to pack smarter for your next adventure.
How Heavy Should My Backpack Be?
Here's the golden rule: your fully packed bag shouldn't weigh more than 20% of your body weight. So, if you weigh 150 pounds (68 kg), you’re aiming for a max weight of 30 pounds (13.6 kg). Sticking to this simple guideline is honestly the best thing you can do to avoid the kind of aches and exhaustion that can turn a great trip into a slog.
Some hardcore ultralight backpackers push this even further, aiming for a base weight (that’s everything except food, water, and fuel) of under 10 pounds (4.5 kg). Overpacking is the number one mistake most beginners make. My advice? Lay everything out before you pack and be ruthless about what you actually need.
What Are the Best Budget-Friendly Backpacking Brands?
You absolutely do not need to drop a small fortune to get kitted out with reliable gear. There are some fantastic brands out there that deliver incredible value. Look into names like Kelty, REI Co-op, and Decathlon's Forclaz line—they all make durable, solid-performing gear that won’t break the bank. At the end of the day, the best gear is the stuff that fits your budget and does the job you need it to do.
Another pro tip is to buy used. Check out sites like REI's Used Gear section or scope out local outdoor consignment shops. They can be absolute goldmines for finding high-end equipment at a fraction of the retail price.
Do I Really Need Specialized Backpacking Food?
Nope, not at all. While those pre-packaged, freeze-dried meals are super convenient, they can get expensive fast and are definitely not your only option. With a bit of creativity, you can assemble amazing, high-energy meals right from your local grocery store.
Focus on lightweight, calorie-dense items that just need a bit of hot water. We're talking instant oatmeal, ramen noodles, couscous, and instant mashed potatoes. Throw in some jerky, nuts, and dried fruit for good measure. Going the DIY route not only saves a ton of money but also gives you total control over your menu.
How Can I Pack More Sustainably?
Packing with the planet in mind comes down to a few conscious choices that make a big difference. The easiest place to start is with reusables. A good water filter or purifier, for example, completely eliminates the need for single-use plastic bottles.
Also, look for solid toiletries. Things like shampoo bars and toothpaste tablets are game-changers for cutting out plastic packaging. When you do buy new gear, try to support brands that are open about their commitment to sustainability. And of course, always live by the Leave No Trace principles—if you pack it in, you pack it out. To learn more about planning eco-friendly travels, check out our guide on essential trip planning tips.
Here at Travel Talk Today, we believe the best adventures start with knowledge and confidence. Use these answers to fine-tune your packing list and hit the trail ready for whatever comes your way. Start planning your next journey today by visiting https://www.packlight-journeys.com.