The first time I stepped into an abandoned mill, the loudest thing in the room was water dripping through a broken roof onto concrete. My camera came up second. Looking mattered, but reading the building mattered more.
The Urbex Mindset Ethics and Legality First
Urban exploration photography attracts people for obvious reasons. Decay has texture, abandoned interiors hold mystery, and forgotten buildings often preserve traces of lives that moved on long ago. The practice has also grown far beyond a niche pastime. One guide notes that urban exploration photography, or urbex, has expanded from a niche hobby into a widely practiced genre of architecture photography, often centered on documenting abandoned factories, derelict homes, and urban ruins, while the community's core rule remains “take nothing but pictures, leave nothing but footprints” (Iceland Photo Tours on urbex photography).

That rule isn't sentimental. It's the difference between documentation and consumption. If you move objects for a cleaner frame, pocket an artifact, pry open a door, or publish enough details to turn a fragile site into a weekend attraction, you stop being a witness and become part of the damage.
Respect is part of the craft
The strongest urbex images don't come from domination of a space. They come from restraint.
A chair left by a window matters because it was left there. Dust on a piano matters because time placed it there. The photograph gains force when the scene is honest.
Practical rule: If your photograph requires altering the site, the photograph isn't worth making.
A good ethic also changes how you move. You close gates if you found them closed. You don't break entry. You don't force drawers, cabinets, or personal containers open. You don't treat an abandoned place like a prop warehouse.
Legality is not a technicality
A lot of people talk about urbex as adventure first and consequences second. That's backwards. Many abandoned places are still private property. Some are monitored. Others sit in legal gray areas that are much less gray once an owner, caretaker, or police officer arrives.
The honest starting point is simple: if you don't have permission, you may be trespassing. That doesn't become acceptable because the building is empty, photogenic, or historically interesting.
This is one reason urban exploration photography overlaps with the values behind thoughtful, low-impact travel practices in sustainable tourism. The point isn't to extract an experience from a place. It's to leave as little trace as possible while preserving what you encountered for others and for the historical record.
What ethical explorers actually do
Instead of asking, “Can I get in?” ask better questions:
- Who does this place belong to: Ownership shapes access, risk, and your responsibility.
- What condition is it in: Fragile spaces can be damaged by one careless step.
- What story am I preserving: Documentation should serve memory, not spectacle.
- What happens if my post sends strangers here: Exposure can accelerate vandalism.
The most mature urbex photographers act less like collectors and more like archivists.
That mindset changes everything that follows. Your route, your kit, your behavior on site, your editing choices, and what you share publicly all start from the same premise. Respect the place more than your portfolio.
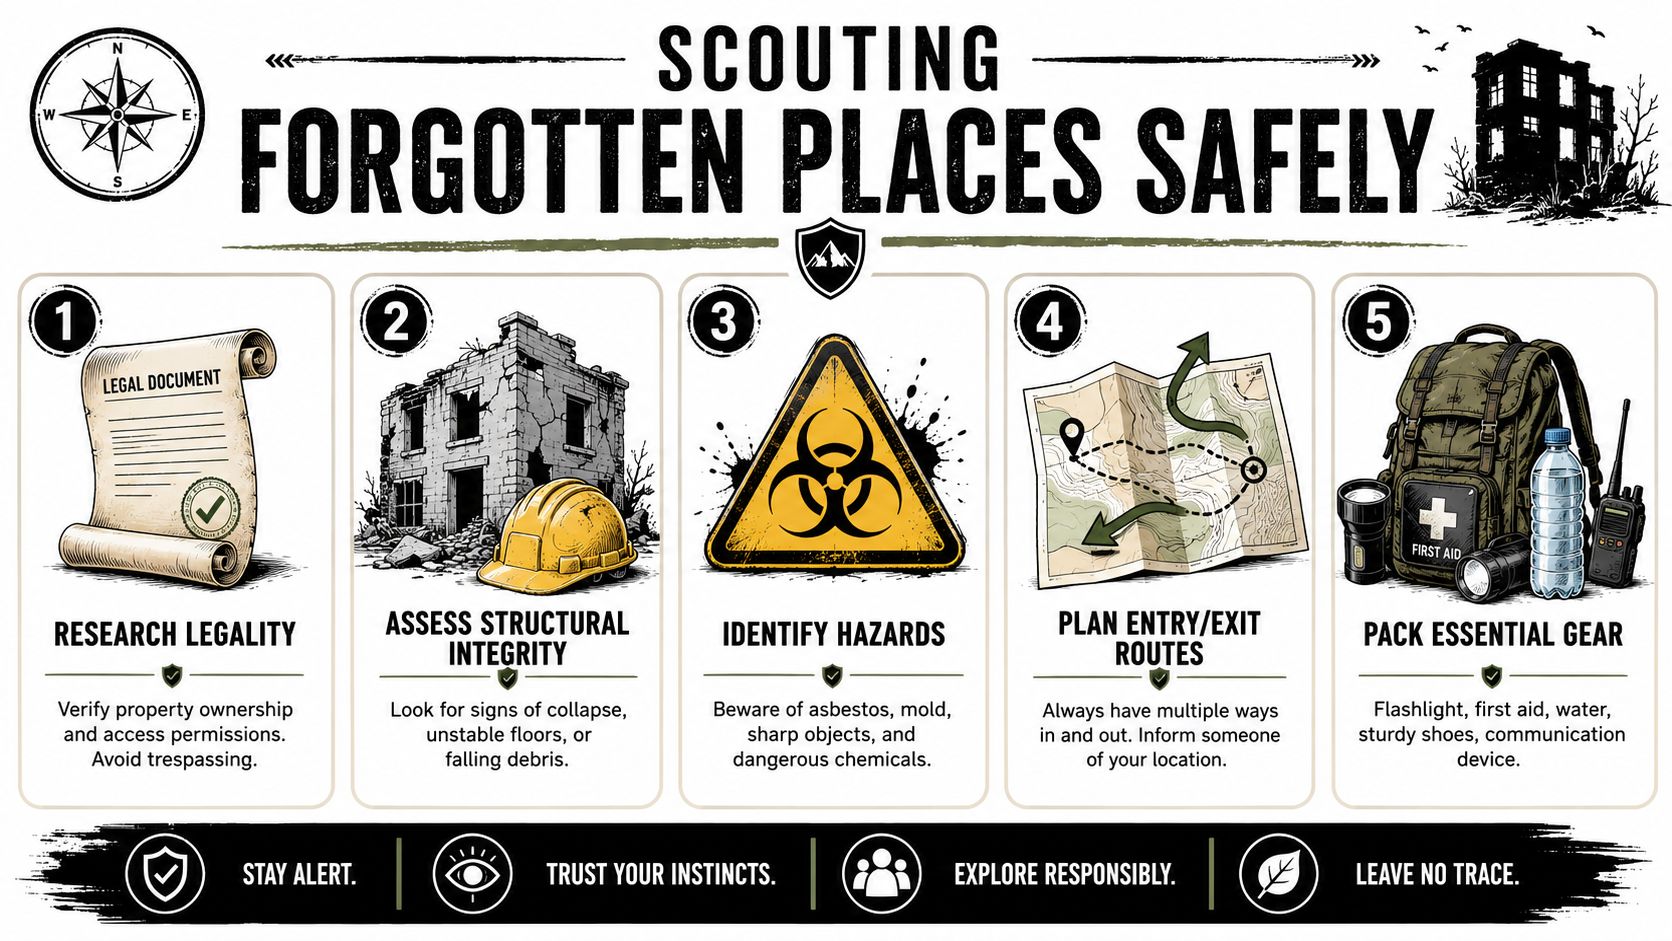
Scouting Forgotten Places Safely
Finding locations is part detective work and part disciplined refusal. Some places look perfect online and feel wrong the moment you see them in person. The key is to make those judgments before curiosity overrides common sense.
A safety gap runs through a lot of beginner advice. One source argues that existing guides spend too much time on gear and composition while neglecting legal and structural danger. It reports that 68% of recent urbex incidents in 2024–2025 involved collapse or trespass charges in EU and US markets, while only 12% of beginner guides included risk-mitigation frameworks or legal disclaimers, and it specifically points to indicators like roof sag, foundation cracks, and moisture patterns as useful warning signs (Fstoppers on urbex risks and limits).
Start at a distance
Digital scouting helps you reject bad ideas early.
Use satellite imagery, old map layers, street-level views where available, and local archives. Google Earth is especially useful for seeing roof condition, overgrowth, access roads, loading bays, collapsed wings, and signs of current use. A building with cars outside, fresh fencing, patched windows, or active utility work isn't abandoned in any meaningful way.
A solid pre-visit check usually includes:
Ownership clues
Search public records where available. Even a rough sense of ownership tells you whether you're dealing with a private individual, a company, or a public body.Signs of activity
Fresh tire tracks, recent boarding, new locks, and maintained grounds often mean someone is paying attention.Multiple views of the structure
One angle can flatter a ruin. Rooflines, rear walls, and annexes tell the truth.
If you're building a field bag for this kind of scouting day, a simple backpacking essentials checklist is a useful baseline for water, layers, navigation, and first-aid basics before you add camera gear.
Read the building before entering
On-site reconnaissance starts outside and sometimes ends there. That's not failure. That's judgment.
Look for visible structural warnings:
| Exterior sign | What it can suggest | Best response |
|---|---|---|
| Roof sag | Load failure or water damage | Stay out |
| Foundation cracks | Settlement or structural shift | Increase distance |
| Moisture staining | Ongoing water intrusion and rot | Expect weakened interiors |
| Bowed walls | Structural stress | Do not enter near that section |
| Fallen masonry | Active deterioration | Reassess the entire site |
You don't need to be a surveyor to notice when a building is talking. The mistake is ignoring what it's saying.
If the exterior already shows distress, the interior is rarely better than you hope.
Decide before adrenaline takes over
A simple go or no-go filter keeps you honest:
- No legal access or obvious active ownership
- Visible collapse points
- Standing water with unknown depth
- No clean exit route
- You'd have to climb, squeeze, or force your way in
Any one of those can be enough to walk away.
The strongest urban exploration photography often comes from patience. Sometimes that means returning at better light. Sometimes it means seeking permission. Sometimes it means never stepping inside and making the image from the perimeter. Good explorers know the difference between nerve and recklessness.
Your Budget-Friendly Urbex Camera Kit
You don't need expensive equipment to make strong urbex photographs. You need dependable equipment, and you need to spend on the pieces that solve real problems in dark, dirty, uneven environments.
A lot of beginners overbuy the camera and underbuy everything that keeps them stable and safe. That's upside down. In abandoned spaces, a modest camera on a sturdy tripod will outperform a premium body used badly.
Spend first on support, not status
If you're building a kit from scratch, put your money in this order:
Tripod first
This is the backbone of interior work. Long exposures are normal in abandoned buildings, and stability matters more than brand prestige. Look for solid leg locks, a center column you don't need to raise often, and feet that hold on dusty concrete.Camera body second
Any entry-level DSLR or mirrorless camera with manual mode, RAW capture, and exposure bracketing is enough to begin. Those three features matter far more than marketing claims.Lens third
A practical wide-angle zoom helps in cramped rooms and narrow hallways. You don't need exotic glass. You need a lens that's sharp when stopped down and predictable in manual shooting.
For photographers who also shoot motion on the road, broad overviews like this guide to the best video cameras for travel can help clarify where hybrid features matter and where still photographers can save money.
Safety gear is part of the camera kit
In urban exploration photography, non-camera gear isn't optional. It's the gear that gets you home.
Here's the basic loadout I trust more than any fashionable accessory:
Two flashlights
Not one. Two. One can fail, fall, or run out. A headlamp helps for setup, but a handheld light gives you better directional control for checking floors and corners.Closed-toe boots with grip
Sneakers are a mistake on wet concrete, loose plaster, and nail-strewn floors. Ankle support helps when you have to back out carefully.Gloves
Useful for rusty rails, splintered wood, and rough openings. They also keep your hands cleaner when you're working a tripod in dirty rooms.Respirator rated for dust and airborne contaminants
Dust in abandoned structures isn't just dust. Mold, old insulation, and unknown particles are common enough to treat air quality seriously.Small first-aid kit
Cuts and scrapes happen fast in broken environments. Keep it compact and accessible.
What works and what doesn't
A few trade-offs are worth knowing early.
| Works well | Usually disappoints |
|---|---|
| A simple camera with manual controls | Relying on auto mode in mixed light |
| Heavy tripod with stable footing | Ultralight travel tripod on uneven floors |
| One versatile wide lens | Carrying too many lenses into dirty sites |
| Spare battery and memory card | Assuming one battery is enough in cold interiors |
Cheap gear can still be excellent if it's reliable. Unreliable gear is expensive the first time it fails in a dark stairwell.
Keep the kit lean enough that you can move carefully. If your bag catches on rebar, throws you off balance, or tempts you to set gear down in contaminated areas, it's too much.
Mastering Light in Decaying Spaces
Abandoned interiors punish lazy exposure. A single room can contain black corners, reflective puddles, and bright window openings in the same frame. If you expose for the windows, the room goes flat and murky. If you expose for the room, the windows blow out into featureless white.
That contrast is why serious urban exploration photography depends on a tripod-based bracketing workflow. According to ExpertPhotography, the recommended method for low-light abandoned interiors is to set aperture to f/8 to f/16, keep ISO at 200 to 400, and shoot 3 to 6 exposures at different shutter speeds to cover the full tonal range. The same source also recommends working from RAW files, tone mapping in PhotoMatix, then blending selectively with layer masks in Photoshop and exporting a balanced TIF when needed (ExpertPhotography on urbex bracketing and HDR workflow).
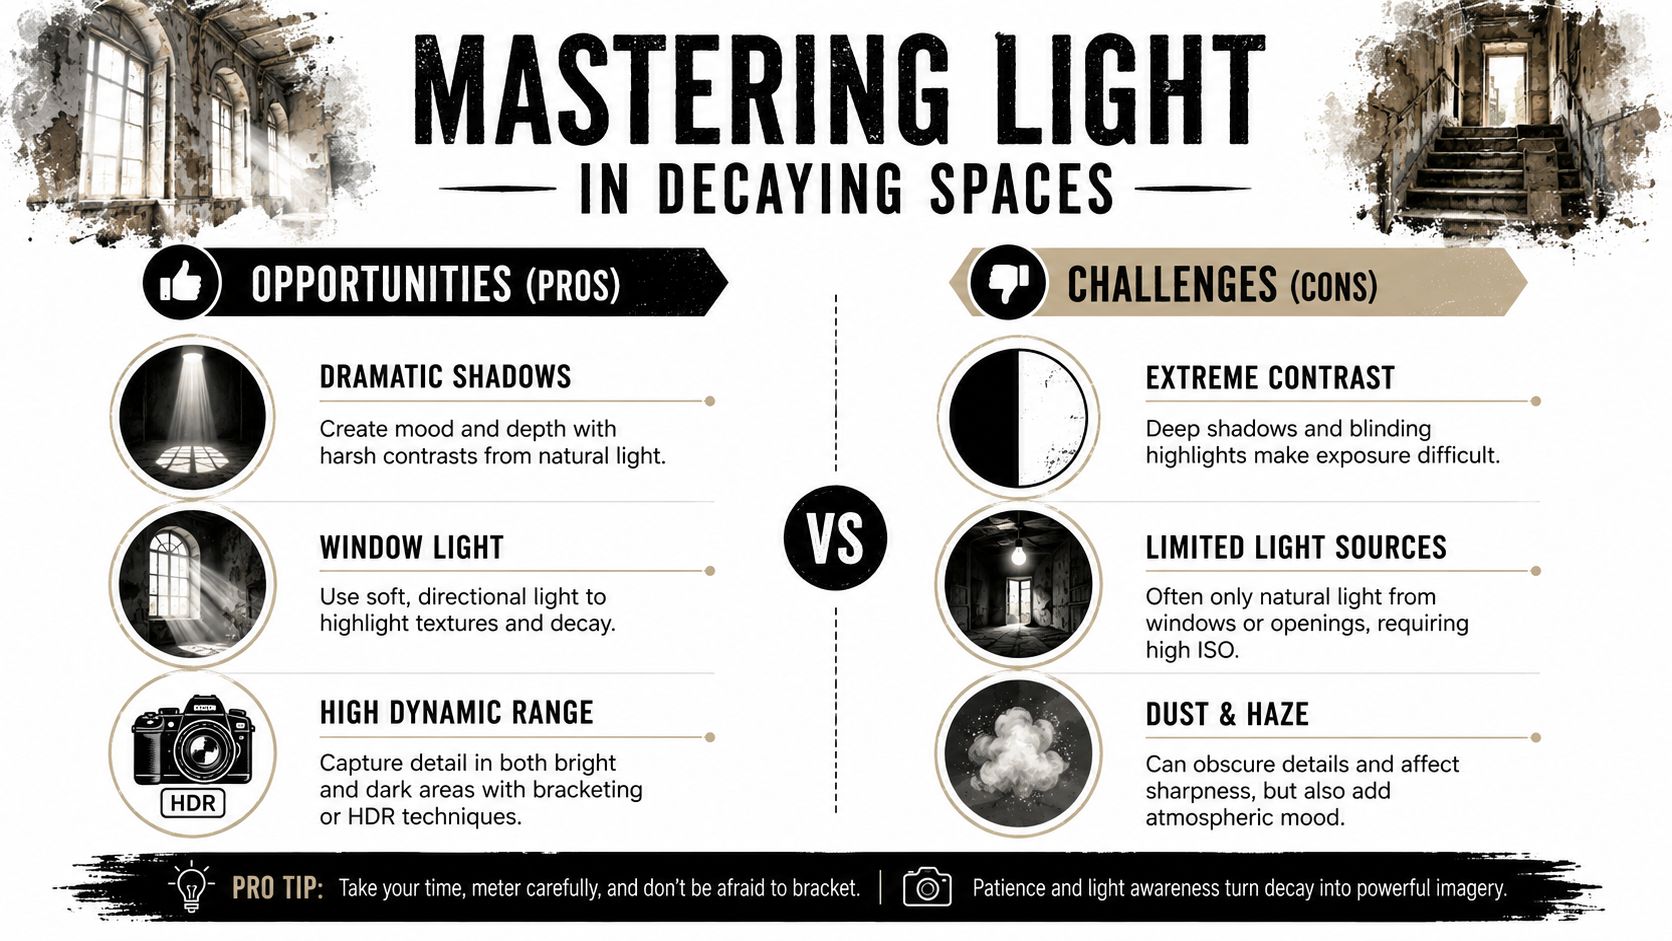
Why these settings work
The aperture range matters because abandoned spaces often reward deep focus. Peeling walls in the foreground, a stairwell in the midground, and a blown-out window frame in the back all belong to the same story. Stopping down to f/8 through f/16 holds those layers together.
The low ISO matters because dark interiors tempt people into noisy shortcuts. Grain can be expressive in some genres. In urbex, it often smears texture. You lose cracked paint, old wallpaper detail, rust patterns, and subtle transitions in shadow.
Varying shutter speeds solve the problem. Light in these spaces isn't scarce so much as uneven. Bracketing gives you clean information for both the brightest and darkest parts of the frame.
The field workflow
On location, keep the sequence simple:
- Mount the camera and lock the tripod down.
- Compose carefully before touching exposure.
- Focus, then switch to manual focus if needed so it doesn't shift between frames.
- Set the aperture and ISO.
- Shoot a bracketed sequence by changing shutter speed only.
That last point is critical. If aperture or ISO changes between frames, depth of field and noise characteristics shift too, which makes blending harder and less natural.
For photographers refining broader low-light instincts, these travel photography techniques offer useful crossover ideas on exposure discipline and scene reading.
A blurred frame from handholding is rarely fixable. A carefully bracketed set gives you options.
Why handheld usually fails here
People often try to solve abandoned interiors with a fast lens and higher ISO. That can work for documentary snapshots, but it usually falls apart when the goal is a finished architectural image.
Here's the trade-off:
| Approach | Gain | Cost |
|---|---|---|
| Handheld at wide aperture | Faster capture | Soft edges, shallow focus, more noise |
| Tripod with bracketed exposures | Maximum detail and tonal control | Slower setup |
| Single exposure | Simpler workflow | Lost highlight or shadow detail |
| RAW bracket set | Flexible post-processing | Larger file management burden |
Urban exploration photography rewards the slower method because the subject isn't moving. The building gives you time. Use it.
Post-processing without the fake HDR look
The editing trap is obvious. You merge your files, discover every surface detail, and push it too far. Suddenly the room glows, halos appear around window frames, and the image looks less like a place than a video game loading screen.
A cleaner process works better:
- Start with restraint so contrast still feels believable.
- Use masks selectively where one exposure handles windows better and another saves shadow texture.
- Correct color gently because abandoned interiors often pick up nasty casts from mixed daylight and stained surfaces.
- Leave some darkness in the frame so the image keeps depth and mood.
The best result doesn't scream HDR. It looks like you were there and could see everything your sensor couldn't hold in one shot.
Composition and Storytelling in Forgotten Places
A sharp file isn't the finish line. Plenty of technically sound urbex photos say very little. They show a room, a hallway, a staircase, and stop there.
The more interesting question is what the space remembers.
One Photofocus piece argues that many guides still treat urbex as purely aesthetic, even though 40% of top urbex photography posts in 2025 focused on personal artifacts, graffiti narratives, or traces of past lives rather than “ruin porn”. It also raises a neglected question: how to document abandoned spaces ethically without erasing their cultural memory (Photofocus on documenting human presence through urbex).

Look for evidence of life, not just collapse
A room becomes a story when you notice what remains of the people who used it. Not every site has obvious relics. Some only offer arrangement, wear, and absence.
Strong narrative subjects often include:
Furniture left in place
A single chair, bed frame, or desk creates implied presence.Patterns of use
Scuffed thresholds, worn stair centers, faded wallpaper around where a picture once hung.Personal remnants
Notes, clothing, calendars, school materials, tools. Photograph them as found, without touching.Graffiti with context
Not all graffiti is vandalism in the same sense. Some markings become part of a site's later social history.
Urban exploration photography can become visual history rather than decoration. You're not just recording decay. You're showing how time acts on human spaces.
Compose for emotion
Composition should support the story, not just organize clutter.
A few approaches work repeatedly in abandoned spaces:
| Visual choice | Emotional effect |
|---|---|
| Leading lines down a corridor | Draws the viewer into uncertainty |
| Doorway framing | Suggests threshold, secrecy, transition |
| Low angle on a small object | Gives importance to overlooked traces |
| Wide scene with one intact subject | Creates isolation and memory |
I often tell newer photographers to search for the argument inside the room. Is the image about loneliness, endurance, disorder, faith, labor, childhood, or retreat by nature? Once that becomes clear, framing gets easier.
The best frame is often the one that leaves a little unsaid.
If you're drawn to place-based storytelling more broadly, ideas around authentic travel experiences translate well here. The goal is similar. Notice what makes a place specific, lived-in, and human.
Ethical storytelling has boundaries
Some finds are photogenic but still demand restraint.
If you encounter family photographs, legal papers, medical records, or personal materials, ask whether publishing them serves history or just satisfies voyeurism. Not everything visible should become content.
A practical test helps:
- Does this image preserve dignity
- Am I showing context rather than exploiting shock
- Would moving closer make the image stronger, or just more invasive
- Can I tell the story without exposing identities
Urban exploration photography gets better when you stop chasing only grandeur. The empty theater is compelling. The handwritten maintenance note backstage may be more important.
Editing and Sharing Your Work Responsibly
The edit starts long before sliders. Good processing depends on clean files, consistent brackets, and a clear idea of what you want the finished image to feel like. If the fieldwork was chaotic, the digital darkroom becomes a repair shop.
My preference is a natural finish with a long tonal range, visible texture, and enough shadow left intact that the building still feels abandoned. The point isn't to make ruin look glamorous. It's to make the image legible without stripping away its atmosphere.
A simple workflow from RAW to final image
For bracketed interior sets, this order stays efficient:
Review the sequence
Remove frames with vibration, accidental focus shift, or moving debris that complicates blending.Merge cautiously
Use HDR software or manual blending. Automation is fine as a starting point, but don't let it decide the whole look.Correct exposure balance first
Recover windows, open important shadow detail, then stop.Handle color casts
Abandoned spaces often mix cold daylight with stained walls and reflected color. Neutral isn't always the goal. Believable is.Refine local contrast
Texture in rust, plaster, wood grain, and peeling paint should emerge without looking crunchy.Clean distractions sparingly
Sensor dust and accidental flare can go. Historical marks, dirt, and wear usually stay.
A natural edit is usually less dramatic on screen than the overprocessed version. It prints better, ages better, and respects the subject more.
What not to do in post
A few habits weaken otherwise strong urban exploration photography:
Overcooked HDR
Halos around windows and glowing shadows make old buildings look synthetic.Heavy clarity on every surface
Texture should feel discovered, not hammered into the file.Crushed blacks for mood
If every shadow goes solid, you lose the very detail you worked to capture.Removing too much evidence of age
Scars are part of the record.
Sharing can damage the places you love
The largest mistake many beginners make happens after the edit. They geotag the site, reveal the town, show the entry point, or answer location questions publicly for attention.
That choice can bring vandals, souvenir hunters, reckless thrill-seekers, and crowds that accelerate a site's decline. Once a place gets overexposed, it often changes fast. Boards go up. Fires happen. Objects disappear. Walls get covered. Access closes.
A safer sharing practice looks like this:
| Better sharing habit | Why it matters |
|---|---|
| Keep captions general | Protects the site from easy tracing |
| Remove metadata and geotags | Limits searchable location clues |
| Avoid showing access points | Prevents copycat entry |
| Focus on history and atmosphere | Builds appreciation instead of traffic |
| Share privately with trusted people | Preserves community standards |
If your post makes a fragile site easier to find, your photo may outlive the place for the wrong reason.
There are good ways to contribute. Write about the building's context when you know it. Mention preservation concerns. Encourage permission-based access where possible. Show care in the language you use. “Abandoned” doesn't mean ownerless. “Ruined” doesn't mean worthless.
The strongest urbex photographers leave behind two things only. Careful images and a light footprint.
Travel has more depth when it's thoughtful, practical, and rooted in respect for place. For readers who want that same approach across photography, safety, budgeting, and meaningful exploration, Travel Talk Today offers grounded advice for seeing more while leaving less impact.


